Instalación de una regadera de mano sobre una barra de desplazamiento
Preparación:
Video: Instalación de una regadera de mano sobre una barra de desplazamiento
Herramientas recomendadas: Llave ajustable, destornillador Phillips, destornillador de cabeza plana, taladro, brocas, cinta para medir, Level, lápiz
|
|
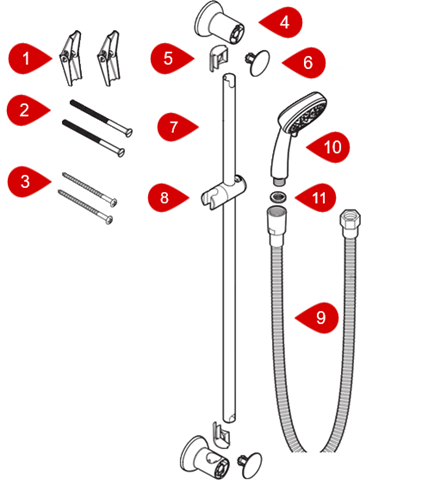
Instalación:1. Determine donde se localizará el montaje de la barra de desplazamiento. Utilice un level y un lápiz para marcar la ubicación de los orificios para los tornillos. 2. Taladree un orificio guía de 5/16" para determinar si hay una viga.
3. If your model has slide bar caps (#5) slide one in the top of the slidebar (#7) and the other in the bottom of the slidebar (#7). Not all models have slide bar caps (#5). 4. Align the notch in the top of the slidebar (#7) with the groove in the post (#4). Slide the top of the slidebar (#7) into the post (#4) making sure the button on the slider (#8) is facing up. 5. Use either the wood screws (#3) or the toggle bolts (#1) and bracket screws (#1) to secure the slide bar and post to the wall. If using the anchors (#1), slide the bracket screw (#2) through the post (#4) and thread the anchor (#1) onto the end of the bracket screw (#2) a few turns. Pinch the ends of the anchor (#1) against the bracket screw (#2) when inserting into the wall. Tighten the screws.
6. Snap the decorative post caps (#6) into the front of the posts (#6). 7. Thread the rounded end of the hose (#9) into the handshower (#10). 8. Insert the washer (#11) into the hexagonal end of the hose (#9). This end will thread on to either a drop ell or a shower arm diverter and tighten with an adjustable wrench. Vea "Artículos relacionados" para instalar el conector drop ell. |
Para obtener una guía completa, visite solutions.moen.com y seleccione el tipo de producto que está reparando. La guía incluye información específica asociada con ese estilo de producto.
¿Sigue sin encontrar lo que busca?
Contáctenos o llame al 1-800-BUY-MOEN
¿No está en los EE. UU.? Moen Canadá | Otros Sitios internacionales